Math-Pumpkin Patch Subtraction
I found this poem at the following website: http://www.preschoolexpress.com.
You can use the little Brach's pumpkins for this, or a felt board like they suggest. We don't have a felt board so we're sticking to the candy!
FOUR LITTLE PUMPKINS
Four little pumpkins
I can see.
______picked one
That left three.
Three little pumpkins
With nothing to do.
______ picked one
And that left two.
Two little pumpkins
Out in the sun.
______ picked one
And that left one.
One little pumpkin
All alone.
It looked lonely
So I took it home. Jean Warren
L.A. - Alphabet
This really has nothing to do with pumpkins but I've been wanting to do this for a while and today's the day! When I subbed in a kindergarten room we helped the kids learn their letters with flash cards. As I've said in the past, I'm not a huge fan of flash cards because I love active learning, but flashcards can be useful every now and then. I'm going to find pictures on the web and make my own set to practice with my preschooler. She is starting to take in interest in learning the alphabet and the sounds the letters make, so that's why I'm choosing to do this now. Here's an example of the type of set I'm making:
A - apple
B - boy
C - cat
D - dog
E - elephant
F - fish
G - girl
h - hat
i - igloo
j - jump
k - kite
l- lion
m - mouse
n - needle
o - octopus
p - pear
q - quilt
r - rabbit
s - snake
t - tiger
u - umbrella
v - violin
x - x-ray
y - yo-yo
z - zebra
It is helpful to do different motions with some of the letters such as pretend to sew for "n for needle," and really jump for "j" for jump.
The way the kids learned the letters were by saying "A for apple, a for apple, ahh, ahh, ahh" (the last part is to say the sound the letter makes). Another example would be "B for boy, b for boy, buh, buh, buh."
I would recommend that you find out which type of alphabet flash cards your child's school disctrict will use, because it may be difficult to learn one whole set and then switch to another when they start school. If your child is use to saying "b for boy" and the school says "b for bear" it might make them a little confused.
Tuesday, October 26, 2010
Monday, October 25, 2010
Pumpkins-Day 7

Pumpkin Math!
I used a mixture of Brach's pumpkins and candy corn to do a variety of math activities with my preschooler.
A few ideas of how you can use this candy for math:
Capacity-Use pumpkins to fill various containers. See which container requires the most/least pumpkins.
Counting-line up pumpkins and have your child touch each pumpkin as they count them (this helps develop one-to-one correspondence).
Patterns-create a pattern using the candy such as pumpkin, candy corn, pumpkin, candy corn...and have your child extend the pattern. If this pattern is too each make it more diffcult like pumpkin, pumpkin, candy corn...
Graphing-give your child a handful of candy. Have your child sort and line the pieces up on a piece of large graph paper. Color in the graph.
Sorting-Hand your child a small amount of mixed candy pieces and let them practice sorting them into groups (all the candy corn in one pile and all of the pumpkins in the other).


Language Arts-Pumpkin Writing
OACS-L.A., Writing Process, 5. Dictate or produce "writing" to express thoughts.
You can choose from a whole variety of activities for this lesson. Here are a few ideas:
-Watch the Charlie Brown Halloween cartoon and write about what you would do if you saw the Great Pumpkin.
-Add sentences to photos from the trip to the pumpkin patch to make a scrapbook.
-Write a story about your visit (pretend or real) to the pumpkin patch.
....anything else your child might be interested in!
Craft-Pumpkin Jars

I saw this craft in Family Fun magazine. We took mason jars (accidentally just recycled all of our spaghetti and peanut butter jars right before this craft) and glued long strips of tissue paper to them. We cut out shapes (tying in math) to make a silly face. We used a real candle, but I would definitely suggest using a battery powere tea light to make this silly pumpkin jar light up. This would be a great craft to also do for Thanksgiving center pieces or for Christmas gifts. I will warn you that it can be a little frustrating for the preschoolers because the tissue paper rips easily when it's wet with the glue, and the preschoolers little fingers can get sticky easily, adding to the tearing paper problem. My little one loved this craft, even with the minor annoying parts!
Monday, October 18, 2010
Pumpkins - Day 6

L.A.- Shaving Cream!
Objective-OACS, L.A., Writing Conventions, Handwriting, Indicator 1- Print letters of own name and other meaningful words with assistance using mock letters and/or conventional print.
It’s wonderful when preschoolers to use a variety of their senses to learn. We got out daddy’s shaving cream and wiped a large amount on the table. We took turns “drawing” in it. We reviewed letters and shapes, plus took some time to draw some pumpkins and other silly pictures.
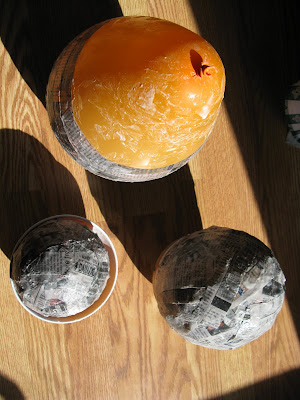
Math- Paper Pumpkins
If you’re like us, you’ll probably need to continue working on your paper mache pumpkins. We are ready to paint our three pumpkins, so that is our goal for today.
NOTE-if going to the grocery you may want to buy a bag of Brach’s “Autumn Mix” for some other math activities later this week.
Science- My mom (who works in an elementary library) found a wonderful book called “From Seed to Pumpkin.” Lily and I are going to read this book and review the life science facts from last month.
Pumpkins- Day 5
Field Trip to a pumpkin patch!
Talk with your child about how the farmer plants the pumpkin, waits for the pumpkin to grow, picks the pumpkin, and then sells it. It would be great if you could actually walk through a pumpkin field or take a wagon ride through one. You can help your child purchase a pumpkin, then bring it home and turn it into a pie or a decoration.
Tip-there are websites that list local pumpkin patches. I know there are a few located in SW Ohio.
Thursday, October 14, 2010
Great Resources and Learning Tools!
This has nothing to do with the pumpkin unit but I'm really excited about it and it's worth sharing.
We keep a budget and try hard to limit our spending, especially since I decided to become a stay-at-home mom. I probably take it to extremes sometimes, such as doing my own "up-dos" for weddings, clipping lots of coupons, learning to sew clothes for the girls, and so on. However, there are times when I find learning resources that are well worth any money I may spend on them (after I find the cheapest way to purchase them, of course)!
These are two tools that I just bought for my girls:

These are called "Mini Geosolids" from Learning Resources. The company has their own site, but I bought this set from Amazon, using my swagbucks (see below).
These are wonderful hands on manipulatives for teaching sorting, patterns, classification, 3-d shapes and so much more! They are fun for her to use now for building little castles and things, but it is definitely a tool that she can use for most of her formal schooling.

This is a set of "pattern blocks" or "attribute blocks" that I bought on ebay. I bought them for the same reasons I bought the geosolids. These are definitely multi-purpose and can be used for many years.
Swagbucks is one of my new favorite websites! It is an great easy program for earning a little extra money for items I normally wouldn't include in our regular budget (such as extra toys for the girls).
All you do is sign up for a swagbucks account, open the email they send to verify your account, and then use it as a search engine. You will randomly win "swagbucks" as you search. These can be redeemed for a whole variety of prizes, my favorite of which is the $5.00 Amazon.com gift card. This is how I purchased the mini geosolids, as well as my youngest daughter's birthday present. You can also earn "swagbucks" by reading their blog and finding codes, doing online shopping through their site, and a variety of other ways. I've used the site for almost a year and I am very pleased with it! The link for Swagbucks is posted below:
For some reason my hyper links aren't working so here's the link to copy and paste:
http://www.swagbucks.com/refer/NatalieWaddle
Pumpkins - Day 4
L.A.
Read pumpkin mini book and poem.
Math/Art - Paper Mache Pumpkins!
We aren't going to do very much math today because this activity is mostly preparation for next week's math activities. Today Lily and I are going to attempt to make two or three different sized paper mache pumpkins/jack-o-lanterns. This will only be the beginning of the project as it will probably take a few days to let it dry and then paint it.
For the pumpkins,
1. Blow up a couple of balloons into different sizes. (Blow one up all the way, one up about half way, and so on.)
2. Mix 1 part flour with 2 parts water for the paste.
3. Cut newspaper into strips (shorter strips work best for the curves on the balloons).
4. Paste strips around balloon forming a "bowl" shape.
Tip-cover work surface with lots of extra newspaper or plastic, use old t-shirts to cover goood clothes!
We will use this project next week for our capacity/volume math activities.
If you don't want to give up math for today you can have your child use a paperclip chain to measure the strips of paper. They can also arrange different strips of paper in order from tallest to shortest, or practice counting strips of paper.
Read pumpkin mini book and poem.

Math/Art - Paper Mache Pumpkins!
We aren't going to do very much math today because this activity is mostly preparation for next week's math activities. Today Lily and I are going to attempt to make two or three different sized paper mache pumpkins/jack-o-lanterns. This will only be the beginning of the project as it will probably take a few days to let it dry and then paint it.
For the pumpkins,
1. Blow up a couple of balloons into different sizes. (Blow one up all the way, one up about half way, and so on.)
2. Mix 1 part flour with 2 parts water for the paste.
3. Cut newspaper into strips (shorter strips work best for the curves on the balloons).
4. Paste strips around balloon forming a "bowl" shape.
Tip-cover work surface with lots of extra newspaper or plastic, use old t-shirts to cover goood clothes!
We will use this project next week for our capacity/volume math activities.
If you don't want to give up math for today you can have your child use a paperclip chain to measure the strips of paper. They can also arrange different strips of paper in order from tallest to shortest, or practice counting strips of paper.
Wednesday, October 13, 2010
Pumpkins-Day 3

L.A.- "The Pumpkin"
I want to work on some basic sight words with Lily, and the best way to teach her sight words is to read them in the context of a story. I'm not a huge fan of flash cards. I think they are fine on occasion, but I definitely prefer teaching new words through actually reading stories. I decided to write a simple little story about a farmer growing a pumpkin to go along with our economics unit.
First, I cut four sheets of printer paper (8.5 in x 11 in.) in half. Then I stacked them on top of each other, folded them in half, and then stapled in the fold.
Here's what I wrote-you can change it to suit your child's needs:
Title "The Pumpkin"
Page 1 - blank
Page 2 - The farmer plants a seed.
Page 3 - Look! It is raining!
Page 4 - The seed sprouts.
Page 5 - The little plant grows.
Page 6 - Look! A little pumpkin is there.
Page 7 - It rains on the pumpkin.
Page 8 - The sun shines on the pumpkin.
Page 9 - The pumpkin is not little now.
Page 10- The pumpkin is big and orange.
Page 11- The farmer picks the pumpkin.
Page 12- We go to the pumpkin farm.
Page 13- We buy the pumpkin.
Page 14- We make pumpkin pie!
I highlighted the preschool Dolche words in the book (Dolche words are a basic list of sight words). We will read this book multiple times. I have Lily point to each word as we read. The illustrations are also key to helping her figure out the words on the page, so take care to match the illustrations with the words.
Here is a list of preschool Dolche words I found on the internet:
a, and, away, big, blue, can, come, down, find, for, funny, go, help, here, I, in, is, it, jump, little, look, make, me, my, not, one, play, red, run, said, see, the, three, to, two, up, we, where, yellow, you.
Math- Pumpkin Face!

Lily is doing fairly well with measurement so we're going to take a little break and go back to reviewing shapes.
I saw in a magazine that one mom took magnetic sheets and cut out black triangles, rectangles, squares and circles, and then let her child use them to decorate a pumpkin that she taped to the refrigerator. While your child plays with the shapes and makes different pumpkin faces you can talk with them about the different shapes. Make sure to keep these away from curious babies!
Subscribe to:
Posts (Atom)